목차

langchain 버전: 0.3.23
langgraph 버전: 0.3.20
내용 출처 : LangGrapn Docs
Learn the basics
Home Guides Tutorials Quick Start 🚀 LangGraph Quickstart In this tutorial, we will build a support chatbot in LangGraph that can: ✅ Answer common questions by searching the web ✅ Maintain conversation state across calls ✅ Route complex queries to
langchain-ai.github.io
1. Graph 개념
LangGraph는 Graph를 구성해 Agent를 만들 수 있다.
Graph의 핵심 구성은 다음과 같다.
- Graph(그래프) : 노드(Node, 또는 정점 Vertex) 와 간선(Edge) 으로 이루어진 자료구조
- Node(노드) : 그래프 내의 개체. 작업 단위(Task). 주로 Tool과 chatbot이 오게 됨
- Edge(간선) : 두 노드를 연결하는 선
- State(상태) : 노드 간에 전달되는 데이터 묶음, 입력과 결과를 저장하는 공간
2. Graph 구현 예시
2.1. State (상태) 정의
다음은 그래프의 상태를 정의하는 기본적인 클래스이다.
State은 다양한 속성을 추가할 수 있다.
예를 들어 챗봇이 엔터티의 생일을 검색하도록 하기 위해 name, birthday 를 추가할 수 있다.
from typing import Annotated
from typing_extensions import TypedDict
from langgraph.graph.message import add_messages


class State(TypedDict):
    messages: Annotated[list, add_messages]
    name: str
    birthday: str
2.2. Graph 정의
상태(state)를 정의 하였으니
StateGraph() 를 이용해 Graph 객체를 만들어 보자
from langgraph.graph import StateGraph

graph_builder = StateGraph(State)
2.3. Node 정의(1, LLM 노드)
먼저 OpenAI의 key를 넣어주자
import getpass
import os

if not os.environ.get("OPENAI_API_KEY"):
  os.environ["OPENAI_API_KEY"] = getpass.getpass("Enter API key for OpenAI: ")
필자는 OpenAI의 gpt-4.1-nano를 사용하겠다.
해당 모델이 가장 저렴하기 때문에 테스트 용으로는 괜찮다.
from langchain_openai import ChatOpenAI

llm = ChatOpenAI(model_name="gpt-4.1-nano")
2.4. Node 정의(2, Tool 노드)
다음으로 Node가 될 수 있는 Tool을 만들어 보겠다.
첫번째 Tool의 내용인 Tavily는
웹 검색 API 서비스를 제공하는 플랫폼 이다.
먼저 travily api key를 등록한다.
if not os.environ.get("TAVILY_API_KEY"):
  os.environ["TAVILY_API_KEY"] = getpass.getpass("Enter API key for Travily: ")
Travily 도구 정의하기
from langchain_community.tools.tavily_search import TavilySearchResults

tool = TavilySearchResults(max_results=2)
두번째 예시 Tool은 사람의 추가 입력이다.
interrupt는 python에서 input() 과 마찬가지로 작동한다
Command 는 state를 업데이트하라는 명령하는 역할을 한다.
from langchain_core.tools import tool
from langgraph.types import interrupt, Command

@tool
def human_assistance(
    name: str, birthday: str, tool_call_id: Annotated[str, InjectedToolCallId]
) -> str:
    """사람에게 대답 요청"""
    human_response = interrupt(
        {
            "question": "Is this correct?",
            "name": name,
            "birthday": birthday,
        },
    )
    # 만약 정보가 맞다면, 기존 방식대로 state 저장
    if human_response.get("correct", "").lower().startswith("y"):
        verified_name = name
        verified_birthday = birthday
        response = "Correct"
    # 기존 정보가 틀리다면, human의 대답으로 state 업데이트
    else:
        verified_name = human_response.get("name", name)
        verified_birthday = human_response.get("birthday", birthday)
        response = f"Made a correction: {human_response}"

	# state 내용
    state_update = {
        "name": verified_name,
        "birthday": verified_birthday,
        "messages": [ToolMessage(response, tool_call_id=tool_call_id)],
    }

    # Command object를 state과 함께 반환
    return Command(update=state_update)
tools(도구모음)을 정의했으면 LLM에 tools를 등록해 주고
tool을 등록한 LLM을 Node로 등록해 준다.
tools = [tool, human_assistance]
llm_with_tools = llm.bind_tools(tools)

def chatbot(state: State):
    message = llm_with_tools.invoke(state["messages"])
    assert len(message.tool_calls) <= 1
    return {"messages": [message]}

graph_builder.add_node("chatbot", chatbot)
마지막으로 tools를 Node로 등록해 준다.
from langgraph.prebuilt import ToolNode

tool_node = ToolNode(tools=tools)
graph_builder.add_node("tools", tool_node)
2.5. Edge 정의
Node를 정의했으니 Edge를 정의해 각각을 연결해 주도록 하자
add_conditional_edges("chatbot", tools_condition) 함수는 다음과 같이 실행한다.
- chatbot 노드 실행 >> LLM이 메시지를 받고 툴을 사용할지 말지를 결정
- tools_condition 함수 실행 >> 다음 노드 이름을 문자열로 반환
add_edge("tools", "chatbot")
- 툴을 실행한 다음 다시 LLM(chatbot) 노드로 돌아가게 만드는 연결
add_edge("START", "chatbot")
- 그래프의 시작점을 "chatbot" 노드로 연결
add_edge("chatbot", END)
- 그래프의 끝점을 "chatbot" 노드로 연결
from langgraph.prebuilt import tools_condition
from langgraph.graph import START

graph_builder.add_conditional_edges(
    "chatbot",
    tools_condition,
)
graph_builder.add_edge("tools", "chatbot")
graph_builder.add_edge(START, "chatbot")
graph_builder.add_edge("chatbot", END)
2.6. Memory 정의
Memory는 챗봇이 이전 대화내용을 기억하는데 사용한다.
즉 멀티턴 대화를 가능하게 한다.
여기서는 테스트용이니 MemorySaver()를 사용해 만들겠다.
실제 운영 환경에서는 SqliteSaver() 또는 PostgresSaver() 등을 사용할 수 있다.
compile() 메서드로 graph를 컴파일 한다.
from langgraph.checkpoint.memory import MemorySaver

memory = MemorySaver()
graph = graph_builder.compile(checkpointer=memory)
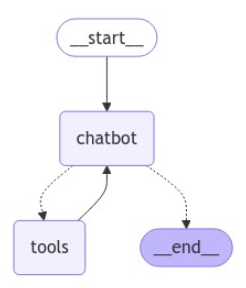
컴파일한 그래프는 시각화해 확인할 수 있다.
from IPython.display import Image, display

display(Image(graph.get_graph().draw_mermaid_png()))
2.7. Agent 호출
stream(), invoke() 메서드로 graph를 호출해보자
config에 넣고 있는 "thread_id" 는 특정 유저와의 채팅 번호를 나타낸다.
즉, thread_id가 다르면 graph는 다른 사람으로 인식한다.
config = {"configurable": {"thread_id": "1"}}
user_input = "Hi there! My name is Will."

# config 는 두번째 인자로 들어감
events = graph.stream(
    {"messages": [{"role": "user", "content": user_input}]},
    config,
    stream_mode="values",
)
for event in events:
    event["messages"][-1].pretty_print()
실행 결과 예시
================================[1m Human Message [0m=================================
Remember my name?
==================================[1m Ai Message [0m==================================
Of course, I remember your name, Will. I always try to pay attention to important details that users share with me. Is there anything else you'd like to talk about or any questions you have? I'm here to help with a wide range of topics or tasks.'자연어처리 > Langchain' 카테고리의 다른 글
| [Langchain] Splitter (Chunker) 만들기 (2) | 2025.07.13 |
|---|---|
| [Langchain] Tools 사용하기 (1) (1) | 2025.03.18 |
| [Langchain] VecterStore 사용하기 (2) | 2025.03.10 |
| [Langchain] Custom Retriever 만들기 (0) | 2025.03.09 |
| [langchain] 유저 채팅 토픽 분석 with BERTopic (1) | 2025.03.08 |